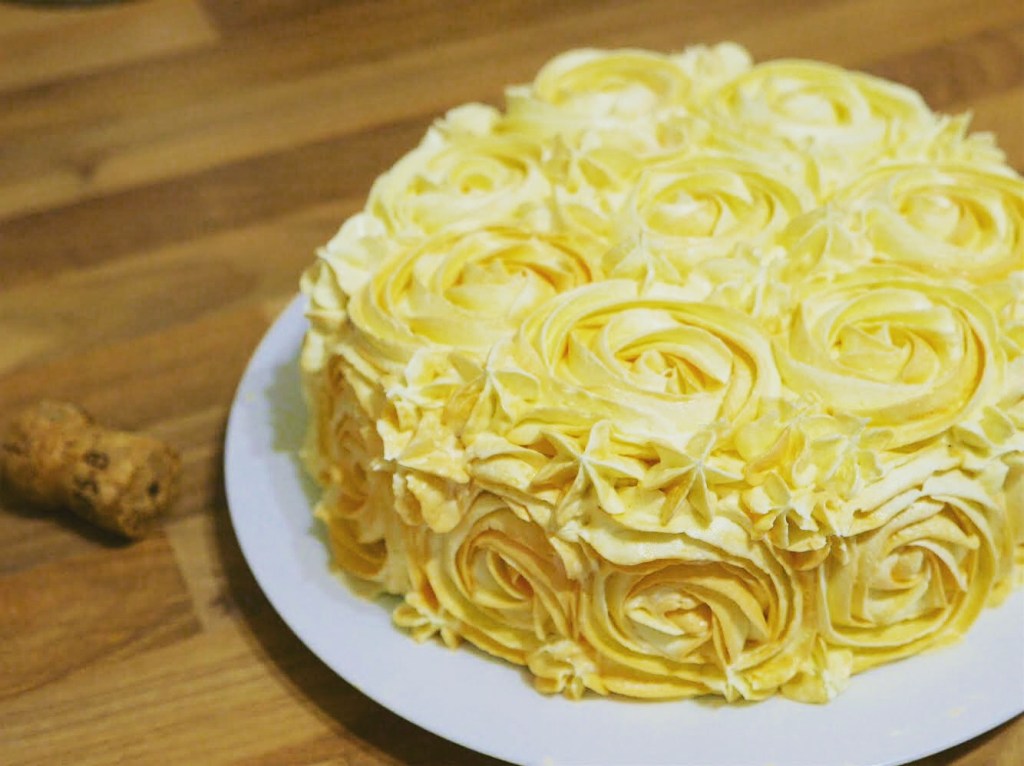
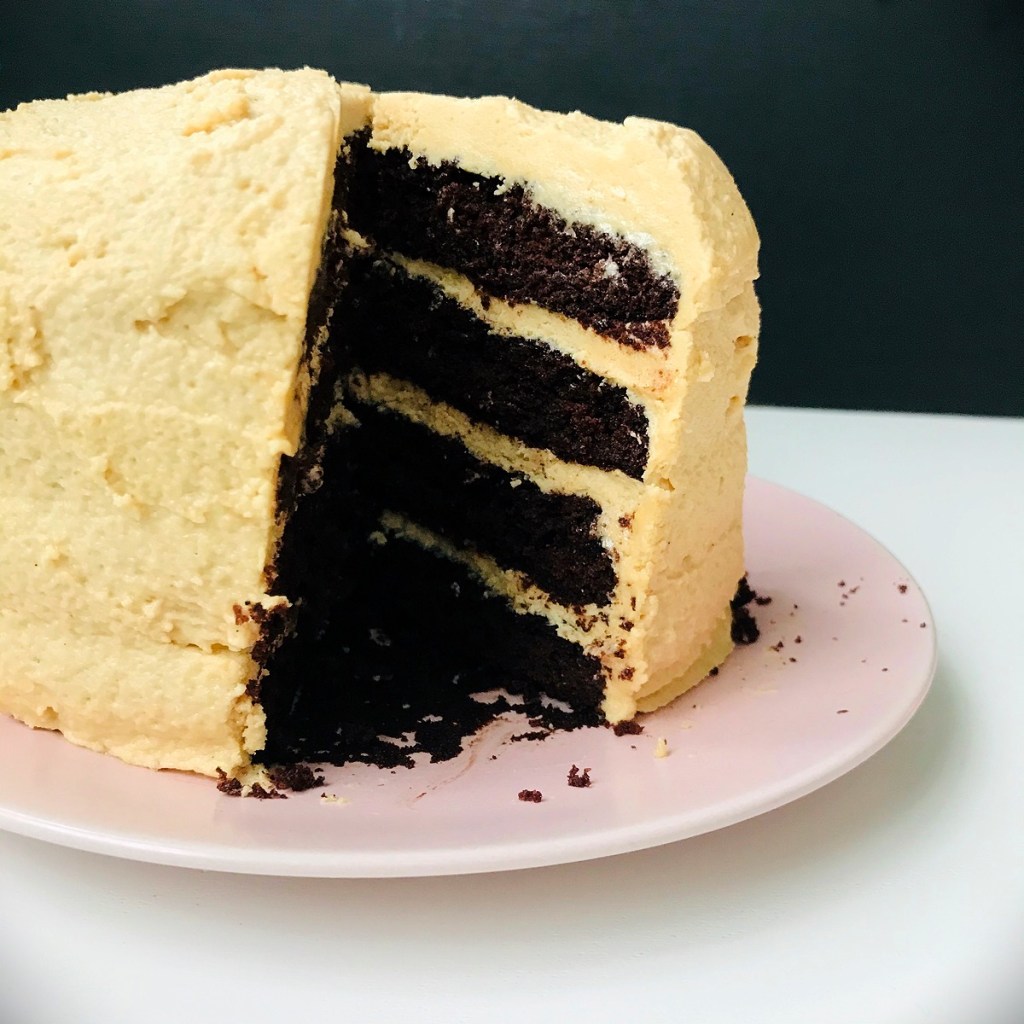
I love a homely-looking loaf cake or a knobbly muffin as much as the next person. Now and again though, there’s nothing quite like putting together a cake with a bit of wow-factor, and this cake certainly has it. I’ve only posted (so far) one other ‘party cake’ – a cake charmingly known as a Lady Baltimore. The Peach Bellini is like the mischievous, frivolous party girl to Lady Baltimore’s more dignified socialite; it’s a deliciously moist, peach-packed sponge cake, layered and decorated with celebratory champagne buttercream. This fun, cocktail-inspired cake makes it a great choice for all sorts of special occasions, and it looks as if quite a bit of effort has gone into it – but truthfully it’s not too difficult to make. Here, I have used a two-tone buttercream and piped it to create a ‘rose-swirl’ effect, but it would also look very elegant if you just use the buttercream in its original ivory glory and simply smooth it all over with a palette knife.
Peach jam can be tricky to find. Bonne Maman do a lovely one but it can be quite hard to track down. However, there is a peach jam made by the Polish company Lowicz. Polish products are readily available in many UK supermarkets – so remember to check the ‘World Foods’ aisle before giving up. This cake will feed 8-10 people, depending how generously you cut your slices!
You will need 2 x 8″/20cm cake tins, greased and lined with a circle of baking paper.
For decorating as shown (optional), you’ll also need a large piping bag, Wilton 1M tip (or any large open-star nozzle) plus a tiny amount of orange food-colouring gel/paste (I used Sugarflair in tangerine.) A palette knife would also be helpful to make spreading easier.
For the Champagne reduction:
300ml Champagne (if you’re feeling flush; otherwise a good Cava will be absolutely fine and no-one will know!)
For the cake:
2 x 400g (approx) cans of peaches – drained weight 250g approx per can. (Use peaches in a ‘light syrup’, not ‘juice’)
300g unsalted butter, softened
300g caster sugar
5 large eggs (US extra large), at room temperature
375g self raising flour
225g peach conserve or jam (see note above)
For the Champagne buttercream:
375g unsalted butter, softened
560g icing sugar, sifted (if you can bear it)
3 tbsp (45ml) champagne reduction, plus an extra tablespoon or so of champagne to taste
Tiny dab of peach food colouring paste (optional)
To start, you’ll need to make a champagne reduction, to be used in the buttercream later. This just means gently simmering 300ml of champagne in a heavy-bottomed until it reduces to a syrupy, amber colour. This is the best way of packing a punch of flavour into less liquid, which is perfect for frosting purposes. This takes up to 20 minutes; but keep an eye on it as you don’t want it to burn. Pour the reduction (you should have around 60ml) into a little jug or bowl and set aside – you won’t need it until you make the buttercream.
Meanwhile, thoroughly drain the two cans of peaches, reserving about 100ml of the syrup. Tip the sliced peaches onto a chopping board and roughly chop, then lightly crush with a fork or potato masher. Pour the reserved 100ml of syrup into a jug and add 2 tablespoons – about 30ml – of Champagne, or to taste. Set both the peaches and the syrup aside.
Preheat the oven to 160c/320f / gas mark 3.
Measure the butter and caster sugar into your mixing bowl and beat together until fluffy. I use the paddle attachment on my mixer for this. It’s impossible to overbeat at this stage, so just keep going until it looks pale and creamy. You can do this by hand but be prepared to roll up your sleeves and break into a sweat.
Lower the speed a little and add the eggs, beating between each addition. When all the eggs have been incorporated, add the flour. My little one loves doing this bit! Once it has all gone in, increase the speed to medium-high and beat for a minute.
Now add the squashed peaches and beat until they look evenly distributed. Tip the mixture into your two cake tins.
Place in the middle of your preheated oven (on the same rack, preferably) and bake for around 55mins – 1hr. Check after about 50mins and quickly switch the positions of the tins if necessary. When they are done, the cakes will spring back if you gently press the centres; they will also look golden brown and the edges will be starting to shrink away from the sides of the tin. You can use a cake tester too, but be aware that moisture from the peaches might deceive you into thinking it isn’t done. This is a very moist cake, but obviously there must not be any actual batter on the tester!
When the cakes are done, place them, still in their tins, on a wire rack for about 20 minutes before very carefully turning out. Use a cake tester or cocktail stick to poke holes all over, then brush the reserved peach syrup all over the tops of the cakes. You might not need all of it. Now allow the cakes to cool thoroughly before attempting to cut and ice them.
Decorating the cake:
Make the buttercream by placing the softened butter and icing sugar into a mixing bowl and beating to kingdom come. (Or about five minutes on high). It should be ultra fluffy and almost white. Now add the champagne reduction, a tablespoon at a time. Add 3-4 tablespoons, tasting now and again for strength. You can also add another tablespoon or so of champagne if you like, but be very careful not to thin the icing. It needs to be thick enough to pipe (or spread, if that’s how you’d like to decorate the cake).
Now you are going to use about 225g of this icing to layer the cakes as follows:
When the cakes are completely cold, use a serrated knife to carefully slice them in half, so that you have four layers. Place the bottom slice on to a plate or cake stand. Spread about 3 tablespoons of peach jam (approximately 75g) on this layer, then dollop on 3 tablespoons of the buttercream and spread over the jam. Repeat this process on the second and third layers before placing the fourth layer on top. Now, using a palette knife, thinly spread a layer (about 100g) of buttercream all over the assembled cake. This is called a crumb coat, and it’s a helpful base to pipe on to – it acts like a glue, as well as helping to mask any gappy bits.
Now you’re ready to pipe the rose swirls all over the cake.
Spoon the peachy-coloured buttercream into your piping bag, and pipe rose swirls all over the sides and top. There are many YouTube tutorials showing how to pipe a rose swirl, but hopefully this will help:
Hold the nozzle at a 90 degree angle to the cake, picking a central spot on the side of the cake. Squeeze the buttercream in an anti-clockwise, circular motion, cutting in slightly to what you’ve already piped, but remember you’re piping flatly on to the cake, not building it up like a tall swirly cupcake. Keep going around and around until it has filled its place on the side of the cake. Then move on to the next swirl, estimating how much space to allow for it to sit nicely next to the swirl you’ve just piped. Work your way around the circumference of the cake then move on to the top, starting in the centre. Then pipe roses around the central rose. Any gaps on the cake can be filled by squeezing out little stars of buttercream – like iced gems – to fill the space.
This will keep for 2-3 days. An airtight container is best, but it will also be alright on a covered cake stand for a couple of days.


Leave a comment